CC2 Guide
CC2 Guide for Go Go Muffin
Last updated: 5/3/2025

CC2 GUIDE
OVERVIEW
Welcome to our CC2 Guide Hub. This Guide Hub contains explanations to all new features, content, and important aspects that will impact the player's progression. CC2 has a total of 140 levels, spanning around 2 months in length. This guide is sorted by when each system is unlocked for ease of use. All rift guides unlocked at this Class Change are compiled below.
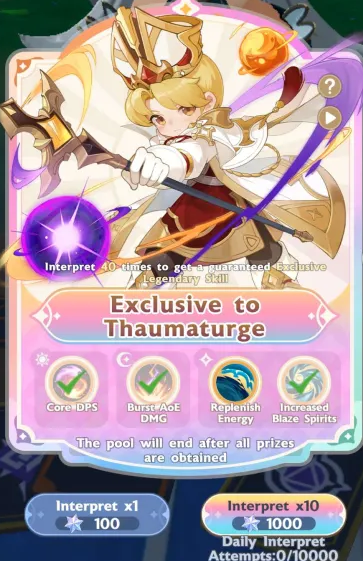
CC2 EXCLUSIVE BANNER
The beginning of CC2 introduces a guaranteed legendary banner. This
banner allows players to summon all of their CC2 Exclusive Skills as
legendary without any duplicates (from this same banner). The banner
guarantees one legendary skill every 40 pulls, and costs 1000
stellarite for every 10 pulls.
With some consideration, this banner could be valuable to those who have
surplus stellarite and are looking for a boost during CC2. This boost
can be quite significant, and will have a large impact on damage. Do
keep in mind that this investment does not carry across Class Changes,
and can be considered ‘temporary’ when compared to other uses, such as
purchasing more Artifact Energy/Mount Tickets/Runes/Cat Wood.
As for the cost of this venture, both class changing and the following
Paper Plane week provides 50-70 skill summons for use in this banner.
This leaves around a 9-11k Stellarite cost for those looking to obtain
all legendary skills from this banner.
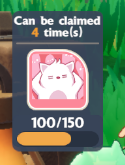
CATBUN
Cat Buns, a new progression system, is unlocked at CC2 Level 1 after
clearing Main Story 30-2. This system unlocks a new type of pet, the
Cat Bun, that provides stats and unique effects to the player.
Initially, a player can only equip one of these pets at a time. As the
player summons and levels their Cat Buns, more slots are obtained. (up
to a maximum of 4 cats can be equipped). The left-most slot is considered
the “main” cat, and is the only cat with their unique effect active.
Cat Buns are divided by their generation. The higher the generation,
the higher the stats provided. A Cat Bun’s Generation also affects the
type of skills they obtain.
These pets are obtainable from “baking” (summoning) in the oven. To bake,
the player needs to use “Cat Wood”, 300 of which is given to the player
every day on server reset.
We recommend players to buy this resource (Cat Wood) 4x a day, to aid
in progressing the Bakery. After the bakery reaches level 7, adjust to
your needs.

For a more in-depth explanation of this system, our recommendations, and more, check out or Cat Bun Guide here.

Catbun Guide
CHAOS SEAL DRAGON
The newest dragon on the block, Chaos Seal Dragon, is unlocked immediately after Class Changing. This dragon's main mechanic is a move that was first introduced by it's 'Echoes of War' counterpart, aptly named 'Multi Chaos Infusion'.
Multi Chaos Infusion
2 Random Targets are marked, signified by smoke surrounding their
character. After a few seconds, players marked explode dealing
sector-wide AoE damage. The smoke will then reapply to 2 random
targets once more before ending.
The goal during this mechanic is to have the players marked go into an
empty sector, so that the explosion wont hit anyone else in the team.
To deal with this mechanic properly, we recommend everyone to all stay
in one sector. Once a player is marked, they should move to one of two
empty sectors so the explosion does not hit anyone else.
The players marked should be on separate empty sectors as getting hit
with both AoEs deals increased damage, and can easily wipe both players
and anyone in the same space.
This mechanic gets a little trickier when introducing Black Tail Sweep,
a move that covers ⅔ sectors. We recommend those marked to tank this
attack instead of grouping towards the safe area, as while Black Tail
Sweep can deal massive damage, the alternative would be grouping up with
the party resulting in a wipe.
LEGENDARY EQUIPMENT
This class change introduces two new legendary equipment sets, the Shiver and the Deeprock set. We will be introducing the Shiver set first as it becomes available at CC2 Level 20.
Shiver Set
The Shiver set provides large ATK bonuses through its set effects,
conditional based on whether the player character currently has a
shield active.
The Shiver set contains 3 Craftable Legendary Equipment: The Weapon,
Torso, and Gloves.
| Set | Effect |
|---|---|
| 2/6 | Increase ATK by 13% |
| 4/6 | Every 15s, gain a shield equal to 10% of your max hp, shield lasting 4s. |
| 6/6 | Each time a shield is gained, increase atk by 20% for 10s |
From the set effects above, we don’t recommend going for the 6/6
bonus set effect as the increase is extremely marginal (0.2% attack)
with an inconsistent uptime compared to running 2/6 icicle. The
player's goal is to swap over to a combination of 4/6 Shiver + 2/6
icicle for maximum attack.
We advise the player to swap their Helmet and Torso immediately for the
2/6 attack set bonus. The Gloves/Bracer should be swapped once it reaches
T5 advancement, and the weapon swapped at T10 advancement.
Weapon and Helmet Crystals become available at the CC2 level 20 rift
onward. Torso Crystals become available at the CC2 level 35 rift
Deeprock Set
The Blackrock set becomes available at CC2 Level 70, and provides an
attack% and mastery% increase, while applying a debuff that
decreases the enemy's damage.
The Blackrock set provides 6 Craftable Legendary Equipment: The Weapon,
Helmet, Torso, Gloves, Greaves, and Boots.
| Set | Effect |
|---|---|
| 2/6 | Increase ATK by 14% |
| 4/6 | Dealing a Critical hit reduces the enemies damage dealt to the player by 6% for 4s |
| 6/6 | Dealing a Critical hit or providing Critical Healing increases Mastery by 15% for 4s |
As this set provides a complete set of legendary equipment, it
allows the player to run 6/6 Blackrock optimally.
We advise the player to swap their Weapon and Gloves at T5 advancement
to activate the 2/2/2 set (2 icicle, 2 shiver, 2 Blackrock) as it provides
the highest attack increase at this stage in progression.
The next set of equipment that should be swapped are the Pants and the
Boots for 4/6 blackrock + 2/6 shiver, unlocked at CC2 Level 85
Last but not least, the last 3 crystals are obtainable at CC2 Level 100,
completing the set and unlocking the 6/6 blackrock set bonus.
Weapon and Greaves Crystals become available at the CC2 level 70 rift
onward. Boot Crystals become available at the CC2 level 85 rift onward.
Helmet, Torso, and Gloves Crystals become available at the CC2 Level
100 rift.
OASIS ARTIFACT AREA
A new artifact zone unlocks when the player reaches CC2 level 21.
This new region introduces some high value +9 artifact bonds that
should be prioritized after obtaining bond level 6 on all relics.
Below are the bonds we recommend players to obtain first:
| Class | Artifact Bond |
|---|---|
| DPS/Healer | Traveler’s Guide +9 Dmg Dealt 2%, Healing Effect 2% Under the Legend +9 Dmg Dealt 2%, Healing Effect 2% |
| Tank | General’s Treasure +9 Mastery 2%, Endurance 1% Amidst the Void +9 Mastery 2%, Endurance 1% |
| General | Mind Voyage Haste 2%, Evasion 1% |
MYTHIC MOVE
Once the player reaches CC2 Level 30, Mythic-Tier Melomon moves are
unlocked. These Mythic Melomon moves are obtainable by upgrading
Legendary Melomon moves with the Mythic Upgrade Material known as
"Imagined Reality" (IR for short).
Imagined Reality can be obtained as a bonus by using 1500 runes. One
Imagined Reality restores on reset,, and these bonus claims can be stored
up to 7 times. (Similar to how expedition keys are stored). Upon unlock,
the system will have 7 Imagined Reality ready to be claimed. The system
also sends the player 10 Imagine Reality through the mail.
IR has two applications. It can be used to upgrade a level 40 legendary
melomon move to mythic, increasing the move's level cap to 60 and increasing
its stat increase per level. This process costs 10 Imagined Reality per
upgrade, and can be refunded at any time.
IR can be used as experience, providing as much as 5 legendary pet exp
per 1 used. Take note that this process "consumes" the IR and does not
get refunded when used as experience.
Optimal Imagined Reality Usage
To preface, without using IR as an experience source, hitting level
40 on a legendary move would prove difficult. Furthermore, using 10
IR as an experience to boost a move to level 40 will provide more
stats when compared to using 10 IR to upgrade a legendary move to
mythic. Do not be afraid to use them as experience.
Our recommended progression points, as it stands, should be to:
-
Level all Pet moves to 25.
This unlocks a crucial resonance bonus that reduces the Melomon's 'Awakening' Cooldown by 5s. -
Level all 3 slots of the Offensive/Defensive Pet Moves to 40.
Offensive Slots for the DPS role, often equipped with the CDMG pet move.
Defensive Slots for the Healers and Tanks, improving healing effect or defensive stats respectively. -
Level the rest of the moves to 30.
This provides the most stats per exp used (if all moves are legendary). Leveling these Moves to 30 activate the next Melomon resonance, increasing the scaling of the Melomon and the stats they provide to the player. - Upgrade the 3 Level 40 Offensive/Defensive Pet Moves to Mythic.
- Level all 3 mythic moves to 60.
-
Level the rest of the moves to 40.
This provides the most stat per exp used (if all moves are legendary). Leveling these Moves to 40 activate the next Melomon resonance, increasing the scaling of the Melomon and the stats they provide to the player.
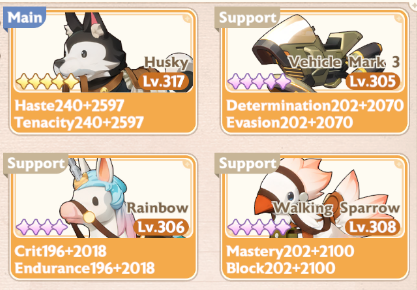
GENERATION 2 MOUNT
A new generation of mounts is unlocked upon reaching CC2 Level 38.
This new generation introduces 4 new mounts. The Husky, the Walking Sparrow,
the Vehicle Mark 3, and Rainbow. These new Mounts provide different skills
and higher base stats when compared to the previous generation.
Below is a table detailing their Skills.
| Mount | Stat Provided | Skill Description |
|---|---|---|
| Husky | Haste & Tenacity | Increases the damage enemies take from you by x% + x. Every 0.25s, randomly increase the damage taken by a single target by x% for 2s. This effect lasts 30s. |
| Rainbow | Crit & Endurance | Increases the character’s ATK by x% + x and Mastery by x%. This effect lasts 30s |
| Walking Sparrow | Mastery & Block | Increase the DMG dealt by x% + x%. Every 6s, gain a shield equivalent to x% of the player’s max hp. This effect lasts 30s. |
| Vehicle Mark 3 | Determination & Evasion | Deals DMG equal to x% ATK + x to enemies. If only one enemy is affected, the DMG is further increased by x%. |
We recommend swapping out generation 1 mounts as soon as possible,
but exceptions may apply. One of the exceptions is when a player's
previous main mount is star gold 1, having 3 stickers slots
unlocked. Depending on the status and ranks of the stickers, it is
beneficial to stick with the older mount until the next generation
reaches purple star 1.
For their main skills, we recommend using the husky for dps, sparrow
for tanks, and the unicorn for healers.
RIFT SHOP UPDATE
Reaching CC2 level 40 updates the rift shop, adding two new
permanent items. Purple EXP and Imagined Reality. The rift shop
provides 4 total imagined Reality per week. The shop updates when
the player reaches and unlocks a new rift, providing a source of
equipment crystals.
We recommend prioritizing the Stellarite, The Star Selection Packs (Skill
Summons), and the Imagined Reality. Next, pick up the corresponding crystals
for the current armor set. Last but not least, obtain the Gear Upgrade
Stones and Star EXP last.
CALAMITY BREAKER DRAGON
The second dragon the player will encounter during CC2, and is unlocked at CC2 Level 61. This dragon will take a bit to get the hang of, as it requires the whole party's coordination.
Holy Judgement - Single/Double/Triple
The boss calls down a meteor, hitting an area after a few seconds.
The area with the meteor spawns a graphic containing 1-3 circles.
These circles indicate how many players should stand within that
area.1 circle = 1 player.
This attack's coverage will scale, increasing in meteors based on the
boss' hp. (Maximum of 3, 1 per sector).
When successful, the players in the area will take a small amount of
damage. When unsuccessful, all players will take massive damage.

General Strategy
A simple way to coordinate the team would be to split the party into
2s, (2/2/2) having 2 players stay at each sector. Between these two
players, one should be designated to stay and one should be
designated to move to fulfill the bosses' mechanics.
Each meteor can have between 1-3 circles. As an example, if there is
a 3 circle meteor within the neighboring area, the designated mover will
move to fulfill slots. If there is a 1 circle meteor within your own
sector, the designated mover should move out of the area.
BURNING TOWER ARTIFACT AREA
A new artifact zone unlocks when the player reaches CC2 level 69.
This region has lower than average efficacy in terms of stat per
level and artifact bonds. We recommend focusing on unlocking
previous +9 artifact bonds after unlocking all of this region’s +6
artifact bonds.
Below is a list of suggestions once the player has obtained all previous
high priority +9 artifact bonds.
| Class | Artifact Bond |
|---|---|
| DPS/Healer | Handful of Money +9 DMG 1%, DMG RES 1%, Healing Effect 1% |
| Tank | Insatiable Lust +9 Mastery 1%, Endurance 0.5% |
CC2 RIFT
Arena of Nine Kings
Unlocked: CC2 Level 1
Gear: Level 165 Icicle Set
Crystal: Weapon, Pants, Boots
Recommended Skills
DPS: Dispel
Tank: Banner, Shield, Taunt
Healer: -
The arena is split into three. The move "Raging Storm" throws AoEs randomly
at the split sectors periodically. The party should aim to dodge these
AoEs and regroup after every "Raging Storm", in anticipation for the
move "Fatal Cage". This attack targets one player and locks them down
in one sector, and after a few seconds, deals massive damage. This move
is deadly when taken alone, but its damage can be spread to members in
the same sector. The Tank is recommended to Banner during this attack.
The DPS will need to dispel the "Beast King's Frenzy". This buff makes
the boss deal significantly more damage. Caution is advised. During the
burst check "Decisive Hammer Blow", one of 3 sectors glows gold and provides
a massive damage boost. We recommend keeping an eye out and moving when
needed.
The Tanks are recommended to Shield the "Star Hammer Strike". This attack
deals massive single target damage and can potentially one-shot when
unprepared.
Rampage in the Valley
Unlocked: CC2 Level 20
Gear: Level 185 Terror Set
Crystal: Weapon, Helmet
Recommended Skills
DPS: Interrupt x2
Tank: Banner, Shield, Taunt
Healer: Shield
We recommend both dps to bring interrupt as a majority of the boss’ moves
can be interrupted. When not interrupted, the boss’ attacks gain power
over time, which will lead to a party wipe.
Both Tank and DPS should time their Banner/Divine Shield for the move
“Fire Breathing” as it deals massive AoE damage.
Hill of Restless Oasis
Unlocked: CC2 Level 35
Gear: Level 200 Terror Set
Crystal: Weapon, Helmet, Torso
Recommended Skills
DPS: Interrupt
Tank: Banner, Shield, Taunt
Healer: Cleanse
The DPS will need to interrupt the move ‘Toxic Storm’ as it applies DoTs
to the whole team over a period of time. When this DoT is allowed to
stack, it will deal massive sustained damage. Interrupting Toxic Storm
also allows the players to see the invisible minions spawned by the boss,
allowing the party to clear them out.
The Tanks should save their shield for the move ‘The Dragon Devours’
as it deals massive single target damage.
The healers should bring cleanse to deal with the stacking DoT as it
can be deadly even when interrupted early.
Pulse of the Sand Abyss
Unlocked: CC2 Level 50
Gear: Level 215 Terror Set
Crystal: Weapon, Helmet, Torso
Recommended Skills
DPS: -
Tank: Banner, Shield, Taunt
Healer: Divine Healing
This boss has a special mechanic, a bar that fills over time that enhances
its moves. When the bar is filled, the boss will automatically wipe the
team. To prevent this, the bar can be reset by destroying one of two
horns attached to the boss. Be warned that destroying the horns too early
or too late will allow the boss to wipe the party.
The DPS are recommended to leave the horns at half hp before targeting
the main body. DPS should destroy a horn once the bar fills past the
face.
The Tanks should save their shield for the move "Ascension" as it deals
massive single target damage.
The Healers will need to use Divine Healing during “Great Earthquake”
as it deals massive AoE damage over time.
Lumberyard Ablaze
Unlocked: CC2 Level 70
Gear: Level 235 Deeprock Set
Crystal: Weapon, Pants
Recommended Skills
DPS: Interrupt
Tank: Banner, Shield, Taunt
Healer: -
Every attack this boss deals will apply a debuff DoT that deals damage
over time. This debuff cannot be normally cleansed by healers. A fruit
will spawn in the arena that the players can click, that will cleanse
the affliction. We recommend consuming a plant once above 10 stacks.
DPS will need to interrupt the move "Great Whirlwind", as it can apply
massive amounts of the aforementioned DoT and will wipe the team if not
interrupted.
Tanks should save their taunts for when the boss initiates "Saw at Full
Strength" as it jumps towards the other party members.
Battle of the Construct Factory
Unlocked: CC2 Level 85
Gear:Level 255 Deeprock Set
Crystal: Weapon, Pants, Boots
Recommended Skills
DPS: -
Tank: Banner, Shield, Taunt
Healer: -
This rift's main mechanic is "Pinpoint Purge", which targets a random
dps/healer and drops 3 consecutive bombs in a row. These bombs inflict
a lingering area of effect and the party must be in constant move to
avoid burning. Players are recommended to move opposite the direction
of their tank, to avoid having the party wiped by the flamethrower.
Tanks should be on a separate sector from the others to redirect the
move ‘Flamethrower’ away from the party. The Tanks must save their shield
for the move "Forced Wipeout" as it will oneshot the tank without it.
Burning Tower of Eternity
Unlocked: CC2 Level 100
Gear: Level 295 Deeprock Set
Crystal: Weapon, Pants, Boots, Torso, Gloves, Helmet
Recommended Skills
DPS: -
Tank: Banner, Shield, Taunt
Healer: Divine Healing
This rift have two Phases which a lot of moves to watch out for, from
Interrupt, Cleanse, Move, Group Up, Split by 2, to Healing Overflow.
But in reality, the boss HP is so low that this rift is actually the
easiest since you are going to skip a lot of moves with decent DPS. It's
recommended to go full DPS even as a Tank role, and running 3 DPS/1 Healer
comp, even 4 DPS is possible but can wipe if the boss have bad RNG move.
During Phase 1, the only mechanics that truly matter are the puddle left
behind by "Darkness Stab" and the Tankbuster ("Dark Dance"). However,
with a well-geared tank, even a DPS-focused setup can safely ignore these
mechanics. Additionally, the boss has an interruptible move called Dark
Reap and a cleansable DoT called Dark Imprint, but these appear so rarely
that they hardly impact the fight. If the fight go for too long, the
boss might cast a move called "Blot out the Sky" which requires everyone
to go to the assigned safe sector. Once the boss reaches one HP bar,
it will trigger a cutscene transition into Phase 2.
In Phase 2, the most dangerous mechanics are "Annihilation Blade", which
requires all players to stack together, and "Crimson Moon Blade", which
demands Divine Healing to survive. The boss may also cast Direnight Slash,
but this can be avoided by moving to the safe sector. If the fight goes
for too long, the boss might start casting moves like "Malevolent Moon"
that requires split group by 2.
Copyright @ 2025 Boarhat.gg