Echoes of War Guide
Echoes of War Guide for Go Go Muffin
Last updated: 20/1/2025

ECHOES OF WAR
Overview
Echoes of War (EoW for short) is an “endgame” raid-like game mode
designed to challenge groups of players and their knowledge of the
bosses’ mechanics. Similar to the Dragon Bounty game mode, the
amount of players that can join the party increases from 4 to 6
players.
EoW has 3 difficulties. Elite, Veteran, and Master. For this particular
Echoes, the Revived Sealed Dragon, there are no mechanical differences
between the difficulties. Revived Sealed Dragon's stats are increased
the higher the difficulty.
EoW is permanent content, and like trials, only needs to be cleared once,
at each difficulty, to obtain all rewards. Echoes of War also provides
rewards to the whole server based on the amount of parties that have
cleared that stage/difficulty.
When cleared, EoW provides many unique rewards. These include Medals,
Backgrounds, Icons, Borders, and Weapon Skins. EoW also provides 500
stellarite per difficulty cleared, up to 1500.
Below we breakdown the bosses’ mechanics, what each class should look
out for at certain points of the fight, and what players should prepare
before trying to clear this raid.
REVIVED SEAL DRAGON
Preparation
Before heading into the fight, there are a couple things the players
should prepare and change within their loadouts.
For all intents and purposes, every player should run Turning Point as
their 3rd talent tree. This gives the party some breathing room, while
giving players time to learn the timing of the raid’s mechanics without
fear of having to restart/wipe.
For each difficulty, there are CP breakpoints that we recommend passing
before starting a run. Our recommendations are merely the baseline at
which the content is clearable, as higher CP/stats will make runs a lot
smoother.
These recommended breakpoints vary between roles as they have different
objectives to fulfill. Keep in mind that these breakpoints were made
with the builds that can be found here, and a different build may or
may not need higher CP.
- Tank/Healer : 650k
- DPS : 700k
- Tank/Healer : 900k
- DPS : 950k
- Tank/Healer : 1200k
- DPS : 1150k
Loadout
- ALL : Turning Point (Talent)
- DPS : -
-
Tank : Skills (Banner of Courage, War Cry, Stalwart Shield)
Pet - Blade Hound -
Healer : Skills (Restoration, Purification (Phase 1), Group
Healing (Phase 2), Divine Healing)
Swap Purification to Group Healing when the boss is transforming to Phase 2
General Strategy
The fight is done in an arena with three sectors. These sectors are
marked by the moon, the sun, and the stars symbols.
We recommend designating a specific sector for the party to regroup at
after doing every mechanic, as this will help with coordination and certain
moves/mechanics. For this guide, we will refer to the Sun Sector for
regrouping.
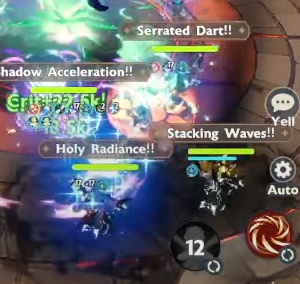
Move List
Dark Gaze

A single target continuous damage beam.
This attack can be interrupted if the team deals enough damage.
Tanks will need to have taunt up so this attack does not target
squishier team members, and use Banner of Courage, Stalwart Shield,
and Blade Hound to survive the attack
- DPS : Burst
- Tank : Banner of Courage, War Cry, Stalwart Shield, Blade Hound
- Healer : -
Cursemark

The Dragon reveals rotating rings around its body, indicating where the explosion gonna occur, dealing massive damage to marked sectors. Avoid the marked sector at all costs or suffer -ATK% Debuff.
- DPS : Move
- Tank : Move
- Healer : Move
Ethereal Blast

An AoE Attack that deals damage to every sector
- DPS : -
- Tank : Banner of Courage
- Healer : -
Black Tide Burst
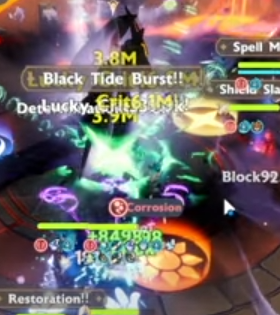
Applies an AoE debuff that deals Damage over Time. The healer should cleanse the debuff immediately after it is applied.
- DPS : -
- Tank : Banner of Courage
- Healer : Purification
Dragon Liberation
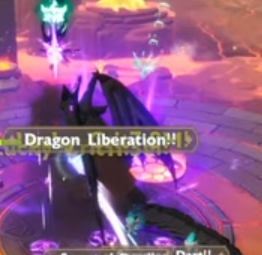
A Continuous AoE attack capable of wiping the group. Used once, upon hitting phase 2.
- DPS : -
- Tank : War Cry/Banner of Courage
- Healer : Divine Healing
Corruption

Marks every player with a symbol above their head. After a few seconds, will deal aoe damage in a sector that contains the non-matching symbol. The segment AoE inflicts a -ATK% debuff.Move towards the sector that is marked above the player's character model.
- DPS : Move
- Tank : Move
- Healer : Move
True Flame
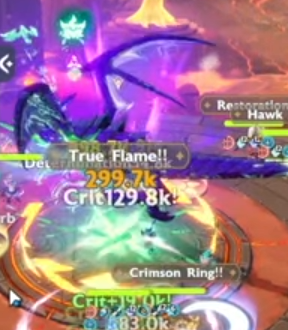
A rotating flamethrower. Once cast, a rotating graphic below
the dragon’s body can be seen, The direction in which these
arrows point towards and rotate signifies which direction
the flamethrower will go towards.
Players should stay on the opposite side of the dragon’s mouth,
where the arrows are indicating. This will buy the player time
to move between sectors without getting hit. The party should
only need to move 4x before true flame ends.
If this ability is cast during the same time as other moves such
as “Multi Chaos Fusion”, we recommend standing still and taking
one rotation of True Flame as some moves can wipe the whole party.
This is another application of Turning Point, allowing the player
to survive difficult scenarios.
- DPS : Move
- Tank : Move/War Cry/Banner of Courage
- Healer : Move
Scorched Earth

A single target continuous damage beam. If the person
targeted stays in one place for too long, Scorched Earth
deals an AoE sector-wide damage. The AoE Sector-wide damage
occurs every 4 damage ticks from scorched earth.
The Tank must taunt this move, and run to a new sector every
3 damage ticks. Scorched Earth deals massive damage, and All
damage reduction moves are needed to survive (Stalwart Shield,
Banner of Courage, Blade Hound Activation).
The dragon pairs this move with other abilities, which makes
dealing with it troublesome.
When Paired with Corruption, the timing can be tricky. We recommend
the tank to move to a sector that is not the corrupted mark,
and to wait 1-2 damage ticks before moving to their corruptio's
mark, then come back to other sector after finishing Corruption.
When Paired with Multi Chaos Infusion, Tanks will need to sit
2-3 ticks before moving out of the designated “Sun” Sector, possibly
tanking the AoE sector damage from Scorched Earth to avoid wiping
the team with Multi-Chaos Infusion.
- DPS : -
- Tank : Move/Stalwart Shield/War Cry/Banner of Courage/Blade Hound
- Healer : -
Apocalypse
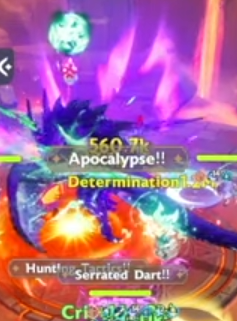
Similar to Dragon Liberation, A Continuous AoE attack capable of wiping the group.Heal through it with Divine Healing.
- DPS : -
- Tank : War Cry/Banner of Courage
- Healer : Divine Healing
Energy Depletion

This happens after Apocalypse, giving DPS burst window because the boss take extra DMG and do nothing. The boss gets an ATK Bonus afterwards.
- DPS : Burst
- Tank : -
- Healer : -
Multi Chaos Infusion
2 Random Targets are marked, signified by the smoke
surrounding their character. After a few seconds, these
marks explode dealing sector-wide AoE damage. The smoke will
reapply to 2 random target once more before they dissipate.
We recommend the group stay in a designated sector, in this case
the sun sector. The two marked targets by the smoke need to move
away from the designated sector separately. Anyone hit by both
AoEs will immediately wipe.
After the explosion, move back to the sun sector. Another two
random targets will be marked and must repeat the same mechanic.
If this move occurs during a true flame, we recommend separating
from the group and tanking the true flame to avoid wiping the
whole group.
- DPS : Move
- Tank : Move/War Cry/Banner of Courage
- Healer : Move
Copyright @ 2025 Boarhat.gg